Friday, 30 March 2012

UVTRON Flame Detektor, How it Works?

UVTron Tube and Driver

Hamamatsu UVTron Flame Detector and driver circuit can detect the flame of a candle or cigarette butts in a distance of 5 meters. Usually it is used as a tool to detect the source of the fire that operate on the length of spectral 185 to 160 nm . Price of this sensor is not more than $ 95 USD.

How it works ?
UVTron tube works when the cathode is given ultraviolet signal. Photoelectron to be emitted from the cathode by photoelectric effect and accelerated to the anode using an electric field. When voltage is applied, the magnetic field increases, the greater the electric field and electron kinetic energy is also great to ionize the gas molecules in the tube to collide. Electrons generated by ionization are accelerated and make ​​it ionize other molecules before it reaches the anode. Positive ions are accelerated to the cathode and collide causing other secondary electrons. This event causing substantial current between the electrodes and occurs the disposal/release charge. The release of the first case, a tube filled with electrons and ions. Voltage drops or falls between the cathode and anode quickly. This status will occur without lowering the anode voltage to below the saturation point. Driver circuit creates a voltage difference required by the tube to allow the process of decay when exposed to ultraviolet light. Then the circuit observing the output current of the tube and when the decay occurs, the voltage at the anode is reduced by the circuit to allow the bulb to repeat it again or reset. Each time the process of decay and release occurs, the signal generated by the circuit or circuits with some effect to the background. Then the output of this sensor is connected to the microcontroller.

Wednesday, 28 March 2012

PING Ultrasonic Distance Sensors and Applications

PING ultrasonic distance sensor is a sensor 40 kHz Parallax production is widely used for applications / robot contest. Advantages of this sensor is that only requires 1 signal (SIG), in addition to the 5V and ground lines.

PING sensor detects the distance of objects by emitting ultrasonic waves (40kHz) during tBURST (200us), then detect the reflection. PING sensors emit ultrasonic waves according to the control of the controlling microcontroller (trigger pulse with the tOUT min 2us).
This sensor specification is as follows:
  • Measurement range of 3cm - 3m.
  • Input trigger-positive TTL pulse, 2 us min., 5 us typical.
  • Echo hold off 750 us from fall of trigger pulse.
  • Delay before next measurement 200 us.
  • Burst indicator LED displays the activity of sensor.
Ultrasonic waves through the air at speeds of 344 m / s, then hit the object and is reflected back to the sensor. PING produces high output pulse on pin SIG after emitting an ultrasonic wave and after wave reflection is detected, PING will make the output  low on the pin SIG. High pulse width (tIN) will be in accordance with the long travel time of ultrasonic waves to  2 times the measure distance to the object. Thus, the measured distance is [(tIN s x 344 m/s) : 2] meters.
To try this sensor is required DT Basic Mini System and Software Basic Stamp Editor to program the microcontroller and try this sensor. The output of the SIG pin is connected to one port on the microcontroller kit. The following examples of sensor applications on the PING Basic Stamp 2 microcontroller, which pin SIG is connected to P9 and provide 5V power supply and ground.  Function of PULSOUT is to trigger PING, while  function of PULSIN is used to measure the pulse corresponding to the distance from the target object.

//Program to test PING distance sensor with DT-Basic Mini System
'{$STAMP BS2p}
'{PBASIC 2.5}

ping PIN 9 //connected to P9
// check type of Basic Stamp
#SELECT $stamp
#CASE BS2,BS2E
trigger CON 13
scale CON $0cd
#ENDSELECT

//constant calculation
rawtoin CON 889
rawtocm CON 2257
isHigh CON 1
isLow CON 0

rawDist VAR Word
inches VAR Word
cm VAR Word

reset:
//displays a message in the window
DEBUG CLS,  "Paralaxx PING Sonar" ,CR,
"=============================",CR,
CR,
"Time  (uS)    . . .  ",CR,
"Inches . . . . .  ",CR,
"Centimeters . . . "

Main:
Do
GOSUB get_sonar //call function get_sonar
inches=rawDist ** RawToIn
cm=rawDist ** RawToCm
//display the calculation results
DEBUG CRSRXY, 15, 3,
     DEC rawDist, CLREOL,
          CRSRXY, 15, 4,
          DEC inches, CLREOL,
          CRSRXY, 15, 5,
          DEC cm, CLREOL
          PAUSE 100
          LOOP
          END
get-sonar :   //main code
          ping =IsLow
          PULSOUT ping, trigger
          PULSIN ping, isHigh, rawDist
          rawDist=rawDist */Scale
          rawDist =rawDist/2
RETURN

Then run the above program, then record the lowest and highest values ​​measured in centimeters and also observe the influence of the emission angle of the measurement results.

There are PING sensor and other Distance sensor Selections :

Friday, 23 March 2012

Learn to Make USBasp is Easy

USB Downloader was made by Thomas Fischl. He used the the USB driver with  AVR that is being developed by Objective Development GmbH. USBasp consists of ATmega48 / 8 and a few passive components without requiring the other driver components. USBasp has several features such as:
  1. Can work on the Linux operating system, Mac OS X and Windows.
  2. Does not require a dedicated controller or SMD components.
  3. Programming speeds up 5Kbytes/sec.
  4. SCK option to support the target device with a low speed (<1.5 MHz)

Here I will help you to create your own USBasp with yourself.
Create a circuit USBasp as shown below with PCB software that you usually use. I use Eagle. (Click on the Picture to zoom in)
After the circuit schematic completed ,  convert to the form of PCB. Examples of  PCB results from the circuit above as:
Setting Hardware
Before the firmware is written to the microcontroller with USBasp, there are some hardware settings that need to be understood. There are three jumpers on the hardware used for configuration, they are:
  1. Jumper 1 (JP1) is used to provide 5V supply to the target through ISP connector. If the Jumper is connected, the target does not require any external supply because has been obtained from USBasp.
  2. Jumper 2 (JP2) is used to perform firmware upgrades. This jumper must be connected if you want to do the writing / frimware upgrade.
  3. Jumper 3 (JP3) connected with pin PC2 as the setting SCK. If the target has a lower clock speed (<1.5 MHz), then this jumper must be connected. SCK will be reduced from 375 kHz to 8 kHz.
Firmware Installation
USBasp made ​​in this post using ATmega8 microcontroller. The firmware can be installed using PonyProg 2000 with a parallel port interface. The steps to install the firmware is as follows:
  1. Connect the Jumper 2 (JP2).
  2. Connect USBasp  with PC / laptop via the USB port. When connecting this, there will be a warning " USB not recognize". Just ignore this warning.
  3. Load the firmware version used in accordance with the microcontroller. The firmware is contained in usbasp.2009-02-28\bin\firmware (download in   usbasp.2009-02-28.tar.gz 260 kB)or usbasp.2011-05-28\bin\firmware (download in usbasp.2011-05-28.tar.gz 519 kB).
  4. Set and setting H-Fuse L-fuse configuration for 12 MHz external crystal . For the ATmega8, H-fuse = 0xC9 and L-fuse = 0xEF, while for the ATmega48, H-fuse = 0xdd and L-fuse = 0FF. For the ATmega8, setting H-fuse and L-fuse  on PonyProg as follows:
  5. Click write to write the settings above.
  6. When finished, remove the back Jumper 2 (JP2) and unplug the USB cable.
Our work is not finished until here, one more step to complete.
Windows Driver Installation
  1. Connect USBasp  with laptop / PC using a USB cable.
  2. Will appear in Windows as shown below.
  3. Select "No, not this time", then press Next.
  4. Then select "Install from specific location (advanced)" and press Next.
  5. Then will appear,
  6. Navigate to the folder where the driver is located, that is, usbasp.2009-02-28 \ usbasp.2009-05-28 \ bin \ win_driver or usbasp.2011-05-28 \ usbasp.2011-02-28 \ bin \ win_driver (I use usbasp.2009-02-28 \ usbasp.2009-05-28 \ bin \ win_driver). In this folder there are two drivers folder. Which is is used depends on the WinAVR is used. If WinAVR that is used more than  2008-05-12, use libusb_0.1.12.1. If the version of WinAVR is used for longer, use libusb_0.1.10.1.
  7. Not long after, the installation process to be completed are marked with the appearance of the dialog box as shown below. Press Finish on this dialog box.
  8. To ascertain whether USBasp been installed properly, check through Device Manager. In the Device Manager will appear USBasp as shown below.
Download Firmware, Driver and Circuit
Software

Tuesday, 6 March 2012

Symmetric Power Supply +35V and -35V Project

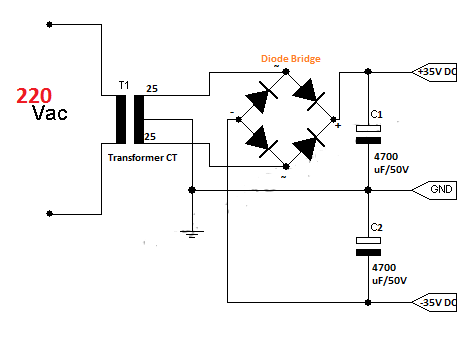
A symmetric power supply is needed when we make project about amplifier. Like an amplifier in sound system, it needs a symmetric power supply to operated. Here, we will construct a simple power supply circuit which result the output voltage is +35V and -35V.

This is the schematic and part of components


This project need a center-tap transformer, I recommend to use 3A transformer for good performances, 35 Amp of Diode Bridge for good rectifier, and 4700uF/50V Capacitor (If voltage of capacitor lower than output voltage, the capacitor will be explode, higher is better).
So this circuit is very simple, with 4 components you can construct a symmetric power supply.
NB:Be careful in the installation of components and wiring.

This is a proof of above project.


Related post :
12V Portable and Mobile Power Supply Circuit Diagram
Charger Circuit Using LM 317 with Input 18V Battery
The Working Principle of Power Supply
Power Supply +12V. -12V and +5V
MAKES A POWER SUPPLY 12V 5A

There are Power Supply Selections :


Twitter Delicious Facebook Digg Stumbleupon Favorites More

 
Design by Free WordPress Themes | Bloggerized by Lasantha - Premium Blogger Themes | Bluehost Review